#frontend folder structure
Explore tagged Tumblr posts
Visit Tumblr Blog
Explore Tumblr blogs with no restrictions, modern design and the best experience.
Last Seen Tumblr Blogs


Fun Fact
Mobile US users spent an average of 115.8 minutes on Tumblr app monthly.
Text
🚀 From Novice to Pro: Build a Swiggy-Style Food App with React 18

Have you ever dreamed of building a food delivery app like Swiggy or Zomato using the most in-demand frontend library, React? Whether you're a beginner or looking to elevate your frontend development skills, React 18 opens up incredible possibilities—and the best way to master it is by getting hands-on.
Imagine being able to create a real-world food delivery platform, complete with features like dynamic menus, cart functionality, and routing—all from scratch. If that sounds like your jam, you're going to love the journey of learning React through the lens of building a Swiggy-style food app.
And here's the good news: you don’t have to do it alone. With the course Mastering React 18: Build a Swiggy-Style Food App, you’ll get everything you need—step-by-step guidance, real-world coding experience, and modern best practices.
Let’s break down why this is one of the smartest ways to learn React in 2025.
Why React 18 Is Still a Game-Changer in 2025
React has come a long way, but React 18 is where the future starts. With features like automatic batching, concurrent rendering, and the transition API, it brings smoother UI updates and better performance to your applications.
These updates are more than just technical improvements—they directly impact user experience. Whether you’re building a personal project or developing apps for clients, React 18 ensures that your interfaces are responsive, scalable, and lightning-fast.
In other words, learning React 18 gives you a serious edge in today’s frontend job market.
What Makes Building a Food Delivery App So Valuable?
You might wonder: why a food delivery app? Why not just build a to-do list or calculator?
Great question.
Here’s the truth: while basic projects help you learn syntax, real-world projects like a Swiggy-style app teach you how to think like a developer. They help you understand how to:
Structure components effectively
Manage application-wide state
Integrate APIs and fetch dynamic data
Use advanced features like lazy loading, routing, and conditional rendering
Optimize performance and manage code reusability
Plus, let’s be honest—a food app is way more fun to build and show off than a to-do list.
What You’ll Learn in This Course
The course Mastering React 18: Build a Swiggy-Style Food App isn’t just about React basics. It’s about learning to build a complete, fully-functional application that mimics the UX and UI of a real-world platform.
Here’s what you can expect to master:
🔹 Setting Up Your Development Environment
From setting up your folder structure to installing the latest React 18 version, the course walks you through everything. You'll even get hands-on with Vite or Create React App for fast and optimized development.
🔹 Component-Based Architecture
You’ll learn how to break your app into reusable, modular components—like headers, cards, menus, and cart elements—following modern practices.
🔹 Routing & Navigation
React Router DOM makes navigating through your app smooth and dynamic. Learn how to implement routes like Home, Restaurant Details, Checkout, and more.
🔹 State Management
Explore React’s built-in useState and useReducer hooks, and get introduced to state management tools like Redux Toolkit or Context API to manage global states like cart contents or restaurant menus.
🔹 Working with APIs
Discover how to fetch real-time data from mock APIs (or real ones!) and display it dynamically in your app. Learn about useEffect, asynchronous calls, and loading states.
🔹 Optimizing User Experience
Dive into performance tricks—like code splitting, lazy loading, and suspense—to make your app lightning-fast and SEO-friendly.
🔹 Responsive Design
Use CSS-in-JS, Tailwind CSS, or plain CSS to ensure your app looks great on all devices, from smartphones to desktops.
Who Is This Course For?
This course is for:
✅ Beginners who know some JavaScript and want to learn React by doing something practical ✅ Intermediate developers looking to refresh their skills and add a real-world project to their portfolio ✅ Freelancers & job seekers wanting to build portfolio-worthy projects that impress clients and employers
Whether you're aiming to land a job, freelance, or build your own startup, this course equips you with skills that truly matter.
Let’s Talk About Career Benefits 🎯
Once you’ve completed the app, you won’t just know React—you’ll own it. You’ll understand how to architect modern applications that can scale, perform, and delight users.
Employers love developers who:
Can build end-to-end projects
Understand state and data flow
Write clean, reusable code
Know how to debug and optimize
By learning through a real-world project like this food delivery app, you showcase exactly those skills.
Practical Features You’ll Build
To make things even more exciting, here are just some of the features you’ll bring to life in your food app:
🛍️ Cart Management
🍔 Dynamic Menus
📍 Restaurant Listings with Filters
📦 Add to Cart / Remove from Cart Functionality
🔄 Routing and Deep Linking
📲 Responsive Mobile Layout
🌐 SEO and Performance Optimization
By the end, you’ll have a polished app that looks and works like something you’d find on the App Store.
Why This Course Over Others?
There are dozens of React tutorials out there. So why pick this one?
Because it’s goal-oriented, real-world focused, and result-driven. Instead of showing you dry concepts in isolation, it walks you through a real business case: a Swiggy-style food app. It helps you think like a product engineer—not just a coder.
Also, this course is regularly updated, uses modern tooling, and helps you understand the why behind the how. That’s crucial when leveling up.
Learn by Doing: No More Tutorial Hell
The problem with most courses? You watch videos, nod along… and forget it all by the next day.
This course is different.
It encourages active learning. You’ll build the app alongside the instructor, write real code, and solve actual challenges. That’s the secret to mastering React and escaping “tutorial hell.”
Build Confidence Through Action
By the end of this course, you’ll have:
✅ A complete, responsive food delivery app in your portfolio ✅ A clear understanding of how React 18 works under the hood ✅ Real confidence to take on new frontend projects ✅ The ability to contribute to or lead React-based projects
It’s not just about watching someone code. It’s about gaining real experience that sticks.
Bonus: Reusable Codebase for Future Projects
Once you've completed the food app, you can reuse its architecture and logic for future e-commerce platforms, restaurant websites, or client projects. You’ll save time, work smarter, and deliver faster.
In short: you’ll have a strong foundation for your React journey.
Get Started Today
There’s no better time to learn React 18 than right now. The frontend ecosystem is thriving, and skills like these open doors—whether you want to work at a startup, land freelance gigs, or build your own product.
Ready to turn your coding dreams into reality?
👉 Mastering React 18: Build a Swiggy-Style Food App is the ultimate hands-on guide to modern React development.
Start building. Start growing. Start coding like a pro. 🚀
0 notes
Text
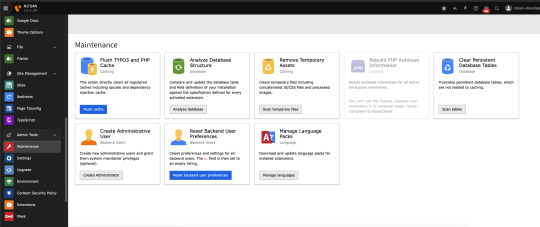
Learn TYPO3 Backend Fast: A Clear Guide for Beginners
Feeling confused after logging into TYPO3 for the first time? You’re not alone—and you’re in the right place. This beginner-friendly guide walks you through everything you need to know about the TYPO3 backend so you can manage your website without stress or tech jargon.

What is TYPO3?
TYPO3 is a free, open-source content management system (CMS) used by businesses, universities, and organizations worldwide. It’s known for:
Flexibility to create any type of website
Strong security features
Scalability for large or growing websites
In short, TYPO3 helps you manage your website’s content, structure, and design—all in one place.
What is the TYPO3 Backend?
Think of the TYPO3 backend as your website’s dashboard—only accessible to you and your team. From here, you can:
Create and edit pages
Add images and videos
Control user access
Install features using extensions
Your website visitors will never see this area—only editors and admins can log in and make changes.
How to Log in to TYPO3
Getting started is simple:
Open your browser and go to: yourdomain.com/typo3
Enter your username and password
Click Login
Tip: TYPO3 login is case-sensitive, so check for capital letters. If two-factor authentication is set up, follow the extra verification step.
Navigating the TYPO3 Backend

After you log in, you’ll see three main areas:
Page Tree (Left Panel): Shows your website’s structure
Content Area (Center): Where you edit pages and content
Top Bar (Top): Gives access to settings, users, and tools
Backend vs. Frontend: What’s the Difference?
Backend: Where editors and admins make changes.
Frontend: What visitors see when they browse your website.
TYPO3 Backend Features You Should Know
1. Page Tree – Your Site’s Blueprint

The Page Tree is like a sitemap. Here, you can:
Create, rename, or delete pages
Organize pages using folders
Drag and drop to rearrange the structure
Click any page to start editing it.
2. Content Area – Edit Content Easily

After selecting a page, the content appears in the center. You can:
Add text, images, and videos
Create buttons or links
Arrange content blocks with drag-and-drop
Preview changes before publishing
No coding required—it’s all visual.
3. TYPO3 Extensions – Add Extra Features
Need more functionality? Install extensions like:
Yoast SEO – Helps optimize your content for search engines
T3AI – Uses AI for faster content creation and translation
News – Adds a blog or article section to your site
How to install an extension:
Go to Admin Tools > Extension Manager
Click Get Extensions
Search for what you need and click Install
Adjust settings as needed
4. User Management – Work as a Team
TYPO3 lets multiple users collaborate. You can:
Add users and assign roles (Admin, Editor, Viewer)
Set permissions based on what each person should access
Avoid conflicts by managing who can edit what
This keeps your site secure and organized.
5. Clear Cache – Refresh Site Changes
TYPO3 uses caching to speed up your site. After making changes:
Click the Clear Cache icon
This ensures your updates appear correctly on the live site
Improve Performance and SEO
Keep your site fast and search-friendly:
Use meaningful page titles and meta descriptions
Add ALT text to all images
Use H1 and H2 tags to organize content
Compress images to reduce load times
Regularly remove unused extensions and clean the database
Troubleshooting: Common TYPO3 Issues

Can’t log in?
Check if Caps Lock is on
Try clearing your browser cache or using Incognito mode
Content not showing?
Clear the TYPO3 cache
Make sure the content is not saved as a draft
Broken links?
Use the built-in Link Validator to detect and fix them
Final Thoughts
TYPO3 might seem complex at first, but once you understand the basics, it becomes a powerful tool. This guide covered everything you need to:
Navigate the backend
Edit pages with confidence
Install features and manage users
Troubleshoot basic issues
With practice, it’ll feel second nature.
Need more help? Join the TYPO3 community, check out the official documentation, or reach out to a TYPO3 agency or expert. You’re not alone on this journey.
0 notes
Text
React JS Development: The Ultimate Guide to Building Modern Web Applications
In the rapidly evolving world of web development, building fast, interactive, and scalable applications is no longer optional—it's essential. Among the many technologies available today, React JS development has emerged as a top choice for developers and businesses alike. Created by Facebook, React.js simplifies front-end development while delivering a superior user experience.
Whether you're a business owner exploring tech options or a developer seeking efficient tools, this guide covers everything you need to know about React JS development, its advantages, real-world applications, and why it continues to dominate the front-end ecosystem.
What is React.js?
React.js is an open-source JavaScript library used for building user interfaces—particularly single-page applications (SPAs). It allows developers to create reusable UI components that update in real time as data changes.
Unlike traditional web frameworks that manipulate the DOM (Document Object Model) directly, React uses a virtual DOM to optimize updates, making apps faster and more responsive.
Key Features of React JS Development
1. Component-Based Architecture
React promotes modular development. Instead of building large monolithic pages, developers create reusable components that make development faster and more organized.
2. Virtual DOM for High Performance
React’s virtual DOM efficiently updates only the changed parts of the UI, improving performance and reducing unnecessary re-renders.
3. Unidirectional Data Flow
Data flows in one direction, making application behavior more predictable and easier to debug.
4. JSX Syntax
JSX (JavaScript XML) allows developers to write HTML-like code within JavaScript, making UI code easier to read and maintain.
5. Strong Ecosystem and Community
With millions of developers worldwide and a vast number of open-source tools and libraries, React JS development benefits from a rich ecosystem.
Why Choose React JS Development?
Fast Development
React’s reusable components, efficient rendering, and active community support make development faster and easier.
Scalability
React can scale from a simple web widget to a full-fledged enterprise application with complex UI logic.
Cross-Platform Possibilities
React Native, a framework based on React.js, allows developers to build mobile apps for iOS and Android using the same codebase.
SEO-Friendly SPAs
Using server-side rendering (SSR) with tools like Next.js, React JS development can be optimized for search engines, solving one of SPA’s biggest issues.
Use Cases of React JS Development
React is used by some of the world’s largest companies, including Facebook, Netflix, Airbnb, and Uber. Common use cases include:
Single Page Applications (SPAs)
Dashboards and Admin Panels
E-commerce Frontends
Social Media Platforms
Real-time Chat and Messaging Apps
Interactive Data Visualizations
Tech Stack for React JS Development
React.js often works best when paired with other modern tools:
Frontend: React, Redux, Tailwind CSS, React Router
Backend: Node.js, Express.js
Database: MongoDB, PostgreSQL
Build Tools: Vite, Webpack, Babel
Deployment: Vercel, Netlify, Heroku
Getting Started with React JS Development
To begin your journey with React.js:
Install Node.js (if not already installed)
Create a new React project
Start building components, connecting APIs, and customizing your UI.
There are also advanced setups like Next.js for server-side rendering and static site generation.
Best Practices for React JS Development
Use functional components and Hooks instead of class components.
Keep components small and focused.
Use PropTypes or TypeScript for type checking.
Implement code splitting and lazy loading to improve performance.
Maintain a consistent folder structure and follow naming conventions.
React JS Development Trends in 2025
As of 2025, React.js continues to lead the front-end world due to:
Ongoing performance improvements
The rise of frameworks like Next.js and Remix
Enhanced support for concurrent rendering
Growing adoption in enterprise-level applications
React is not just a library—it's a central part of the modern development stack, and its role is only growing.
Conclusion
React JS development offers an unmatched combination of speed, efficiency, and flexibility for building user interfaces. Whether you're developing a simple dashboard or a complex web app, React gives you the tools to create clean, maintainable, and dynamic interfaces that users love.
If you're considering front-end development for your next project, investing in React JS development could be one of the smartest choices you make.
0 notes
Text
Frontend Development Using Vue.js

Vue.js is one of the most popular JavaScript frameworks for building interactive user interfaces and single-page applications. It’s lightweight, flexible, and beginner-friendly — making it an excellent choice for frontend developers of all skill levels.
What is Vue.js?
Vue.js is an open-source JavaScript framework for building UIs. It was created by Evan You and is designed to be incrementally adoptable. That means you can use it to enhance parts of your webpage or build full-featured SPAs (Single Page Applications).
Why Choose Vue.js?
Easy to Learn: Simple syntax and comprehensive documentation.
Component-Based: Encourages reusable and maintainable code.
Lightweight: Fast to load and quick to execute.
Reactive Data Binding: Automatically updates the DOM when data changes.
Great Tooling: Vue CLI, Devtools, and a strong ecosystem.
Getting Started with Vue.js
You can include Vue.js via CDN or use Vue CLI for a full project setup.
Using CDN (Quick Start)
<script src="https://cdn.jsdelivr.net/npm/vue@2/dist/vue.js"></script> <div id="app"> <p>{{ message }}</p> </div> <script> var app = new Vue({ el: '#app', data: { message: 'Hello Vue!' } }); </script>
Using Vue CLI (Recommended for Projects)
npm install -g @vue/cli vue create my-vue-app cd my-vue-app npm run serve
Key Vue.js Concepts
Templates: HTML-like syntax with embedded expressions.
Directives: Special attributes like v-if, v-for, v-model.
Components: Reusable, encapsulated UI blocks.
Props & Events: Communication between parent and child components.
Reactivity System: Automatically updates DOM when data changes.
Vue Router: For building SPAs with routing.
Vuex: State management for complex applications.
Example: Creating a Component
Vue.component('todo-item', { props: ['item'], template: '<li>{{ item.text }}</li>' });
Popular Vue.js Libraries & Tools
Vue Router: Adds navigation and routing features.
Vuex: Centralized state management.
Vuetify / BootstrapVue: UI frameworks for Vue.js.
Vite: Lightning-fast development server and build tool for Vue 3.
Best Practices
Break your UI into small, reusable components.
Use Vue CLI or Vite for project scaffolding.
Keep components clean and focused.
Use Vue DevTools for debugging.
Organize files using standard folder structures (components, views, assets, store).
Conclusion
Vue.js is a powerful and approachable framework for frontend development. Whether you're enhancing a small section of your site or building a full-scale web app, Vue offers the tools and flexibility you need. Dive into Vue and take your frontend skills to the next level!
0 notes
Text
What is React.js? A Complete Guide for 2025

What is React.js?
What is React js? A Complete Guide for 2025 dives deep into React.js, the groundbreaking JavaScript library that has transformed the way developers build dynamic and interactive user interfaces. As one of the most powerful and widely adopted tools in modern web development, React, originally created by Facebook (now Meta), continues to dominate the industry with its efficient, component-based architecture and unparalleled flexibility. Whether you're a beginner or an experienced developer, this guide will equip you with everything you need to master React.js in 2025 and beyond.
Reasons for Popularity:
Fast and efficient: Utilizes Virtual DOM for performance and optimization
Component-based: Allows for code reusability and organization
Huge ecosystem: There are many libraries and tools out there that enhance the development experience
It is backed by Meta: All the time updates and new features are added
History and Evolution of React.js
React.js was originally launched in 2013 by Facebook. Over the years, it has passed through several major versions:
2015: React 0.14 was introduced with functional components.
2016: React 15 was designed to improve performance, and so was the implementation of the Fiber architecture.
2017: React 16 brought in Hooks and Error Boundaries.
2020: React 17 emphasized easier upgrades and gradual adoption.
2022+: React 18 introduced concurrent rendering with automatic batching.
Why to Learn React.js by 2025?
Performance and Speed
With fast UI updates made possible by the React Virtual DOM and concurrent rendering, React will be an indispensable framework for modern applications.
Large Community Support
React has a vast user base consisting of millions of developers, and thus, finding resources, tutorials, and support is easier than before.
Flexibility and Scalability
Applications of any size can be developed using React, whether they are small projects or enterprise-level applications.
Core Features of React.js
Virtual DOM
In React, unlike in the normal DOM, only those parts of the UI that were actually changed would be updated, thereby giving faster performance.
Component-Based Architecture
In React, an application is made up of building blocks called components, which are reusable, thereby minimizing redundancy.
JSX (JavaScript XML)
JSX enables developers to write markup directly inside the code.
One-Way Data Binding
This aids in keeping tighter control over the data flow, which is beneficial for easier debugging.
Setting Up React.js in 2025
Install Node.js and npm.
Create a React app using:
npx create-react-app my-app
cd my-app
npm start
Use Vite for faster builds:
npm create vite@latest my-app --template react
Building a Basic React.js Application
Creating Components
function Welcome(props) {
return <h1>Hello, {props.name}!</h1>;
}
Using State with Hooks
import { useState } from 'react';
function Counter() {
const [count, setCount] = useState(0);
return (
<button onClick={() => setCount(count + 1)}>
Count: {count}
</button>
);
}
React.js Best Practices for 2025
Functional components are preferred over class components.
Keep components small and reusable.
Render optimization through memoization (React.memo, useMemo).
Follow proper folder structures.
Error boundaries should be implemented.
Learning React.js at the TCCI Computer Coaching Institute
TCCI offers a comprehensive course on the training of React.js:
React from the beginning to advanced
Projects work from real life
Personal mentorship
Getting certified after completion
Conclusion
React.js will dominate frontend development in 2025. No matter whether you're a fresher or have many years of experience in programming, learning React opens doors to innumerable opportunities. Join TCCI Computer Coaching Institute to master React.js practicing real-time!
Location: Ahmedabad, Gujarat
Call now on +91 9825618292
Get information from https://tccicomputercoaching.wordpress.com/
FAQ
What is React.js mainly used for?
React.js is used for building fast, interactive user interfaces for web applications.
How long does it take to learn React.js?
Depending on prior experience, it can take 2-3 months to become proficient.
Is React.js still relevant in 2025?
Yes, React remains one of the most in-demand frontend technologies.
What are the prerequisites for learning React.js?
Basic knowledge of HTML, CSS, and JavaScript is recommended.
Can I use React.js for mobile development?
Yes! React Native allows you to build mobile apps using React.js.
#ReactJS#WebDevelopment#LearnReact#ReactTutorial#FrontendDevelopment#JavaScript#Coding#TechGuide#Programming#ReactJS2025
0 notes
Text
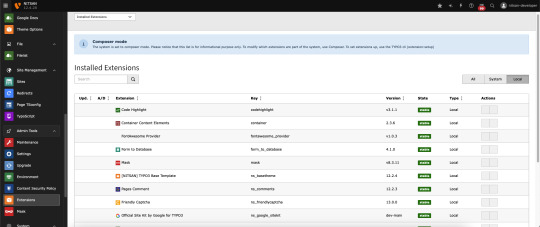
Migrating from Mask to Content Blocks in TYPO3 – A Step Toward a Future-Proof System
For many TYPO3 users, the Mask extension has been a convenient way to create custom content elements without deep coding knowledge. However, TYPO3’s core development is shifting towards a more structured and future-proof solution—Content Blocks.

Migrating from Mask to Content Blocks is not just a recommendation but a necessary step to ensure long-term compatibility, maintainability, and performance in TYPO3 projects. This guide will walk you through why and how to transition smoothly.
Why Should You Migrate?
Mask has been widely used, but it has limitations when it comes to TYPO3’s evolving ecosystem. Here’s why Content Blocks are the better choice:
✅ TYPO3 Core Integration – Content Blocks are becoming the TYPO3 standard and will likely be integrated into future TYPO3 versions. ✅ Improved Maintainability – A structured file system makes it easier to manage, update, and customize content elements. ✅ Better Compatibility – Ensures your custom elements remain functional with upcoming TYPO3 releases. ✅ Version Control Friendly – Since Content Blocks are stored within your site extension, they can be easily tracked in Git.
If you plan to upgrade your TYPO3 website or ensure long-term stability, now is the perfect time to migrate!
How to Migrate from Mask to Content Blocks?
There are two ways to migrate: 🔹 Automatic Migration – Ideal for a quick, bulk transition. 🔹 Manual Migration – Recommended for highly customized content elements.
Automatic Migration (Best for Quick Transition)
For those with multiple Mask elements, an automatic migration tool makes the process easy.
Prerequisites:
Your TYPO3 installation should be version 13 or higher.
Ensure you have a backup of your site before making changes.
Your setup should be Composer-based for easier extension management.
Steps to Automatically Migrate:
1️��� Install the required extensions:
composer require friendsoftypo3/content-blocks composer require nhovratov/mask-to-content-blocks
2️⃣ Run the migration command:
bin/typo3 mask-to-content-blocks:migrate
3️⃣ Remove Mask and the migration tool:
composer remove mask/mask nhovratov/mask-to-content-blocks
4️⃣ Test & Validate: Open your TYPO3 backend and confirm that all migrated elements work correctly.
Manual Migration (For More Control)
If you have complex Mask elements with custom logic, you might prefer manual migration.
Steps to Manually Migrate:
1️⃣ Install the Content Blocks extension:
composer require friendsoftypo3/content-blocks
2️⃣ Create a new Content Block for each Mask element:
bin/typo3 content-blocks:make your_theme/element_name
3️⃣ Transfer CType & Field Names Ensure that the CType and field structure in Content Blocks match your existing Mask elements.
4️⃣ Move Templates & Configurations Copy your existing Fluid templates and TypoScript settings from Mask to the new Content Blocks folder.
5️⃣ Test & Debug After migration, thoroughly test the elements in the backend and frontend.
Final Thoughts
Migrating from Mask to Content Blocks might seem like a big step, but it ensures that your TYPO3 site remains future-proof, structured, and easier to manage. Whether you choose automatic or manual migration, this transition will benefit your TYPO3 project in the long run.
0 notes
Text
Node JS and Databases
Steps to Build a Blog Application
1. Project Setup
First, you create a new Node.js project on your computer.
You also install necessary tools like Express (for creating a web server) and Mongoose or MySQL (for interacting with the database).
Nodemon can be used during development to restart the server automatically when code changes.
2. Folder Structure
Organize your project files so that everything is easy to manage.
Models: This folder will store database schemas (like the blog post structure).
Routes: These handle requests to different parts of your blog (e.g., showing all posts or creating new ones).
Views: These are the templates used to render your pages (like home, post details).
Public: A place for static files (CSS stylesheets, images).
3. Setting Up the Database
You can use either MongoDB (a NoSQL database) or MySQL (a relational database) to store your blog posts.
MongoDB is easier for beginners because you don't need to define strict tables.
You create a "Blog" model, which defines the structure of each blog post (e.g., it should have a title, content, and a timestamp).
The database connection is established at the beginning so the app can interact with it throughout.
4. Handling HTTP Requests with Express
The Express framework helps manage the flow of the app:
When a user visits the home page, the server sends a list of all blog posts.
When they click on a specific post, it shows the details of that post.
There is also a form where users can create new posts by submitting titles and content.
You create routes to manage these requests. Each route corresponds to a specific URL (e.g., / for the home page, /post/:id to view a post).
5. Creating Views (Templates)
To make your pages dynamic, you use EJS (or another templating engine like Handlebars). Templates allow you to display different content based on the data from the database.
For example:
The home page lists all available blog posts with links to view them individually.
The post page shows the title, content, and date of a single post.
There can also be a form on the home page that lets users submit new posts.
6. Routing and User Interaction
When users visit the homepage, the server pulls data from the database and shows a list of posts.
Clicking on a post’s link takes them to a detailed view of that post.
Users can also add a new post by submitting a form. When they do, the app saves the new post in the database and refreshes the list.
7. Starting the App
You need to make sure both the database server and Node.js app are running.
MongoDB needs to be started separately (if using it).
The Node.js server listens for requests and responds based on the routes you’ve created.
The server is accessible via http://localhost:3000. You can open this in a browser to test the blog app.
8. Testing the Blog API (Optional)
To make sure everything works correctly, you can use tools like Postman to test your routes:
Test retrieving all posts by making a GET request.
Test creating a new post by sending a POST request with sample data.
You can also build error handling to manage invalid inputs.
9. Future Improvements
After setting up the basic blog, you can add advanced features:
User Authentication: Allow users to log in and manage their own posts.
Comments: Add a comment section for each post.
Pagination: Break long lists of posts into pages for better readability.
CSS Styling: Make the blog look more attractive with a custom stylesheet.
Summary
This blog app involves setting up a Node.js server, connecting it to a database to store posts, and using templates to render pages. When users visit the blog, they can view, create, or manage posts, all of which are stored in the database. Express routes manage the requests, and the views ensure everything is displayed neatly.
This project gives you hands-on experience with backend development using Node.js, along with frontend templates, and a solid understanding of working with databases.
Fullstack Seekho is launching a new full stack training in Pune 100% job Guarantee Course. Below are the list of Full Stack Developer Course in Pune:
1. Full Stack Web Development Course in Pune and MERN Stack Course in Pune
2. Full Stack Python Developer Course in Pune
3. full stack Java course in Pune And Java full stack developer course with placement
4. Full Stack Developer Course with Placement Guarantee
Visit the website and fill the form and our counsellors will connect you!
0 notes
Text
How to Add Custom Features to a Magento store?

Adding custom features to a Magento store involves a combination of backend and frontend development. Magento is a highly flexible platform that enables vast customization options through themes, modules, and custom code.
Identify the Need:
The first step in adding custom features to a Magento store is to identify the need for it. Find what you need in your store by analyzing your business requirements, customer demands, and competition. It's important to clearly define the purpose of your custom feature and its benefits for your store.
Explore Existing Extensions:
Magento offers various extensions and modules that can be seamlessly integrated into your store. Before investing time and resources into developing a custom feature from scratch, it is worth exploring the existing extensions. You may find an extension that meets your requirements or can be customized to fulfil your needs.
Hire a Magento Developer:
If you can't find an existing extension that meets your requirements, hiring a Magento developer to develop a custom feature for your store is recommended. A Magento developer will have in-depth knowledge and experience in the platform and can help you create a component tailored to your business needs.
Backend Development:
1. Understand Requirements:
Clearly define the custom features you want to add.
Identify whether the features require new database tables, attributes, or modifications to existing ones.
2. Create a Custom Module:
Magento uses a modular structure. Create a custom module to encapsulate your features.
Create the necessary folders and files like app/code/{Vendor}/{Module}/.
3. Define Database Changes:
If your custom features involve new data, create Setup scripts (InstallSchema.php, UpgradeSchema.php) to handle database changes.
4. Create Models and Resource Models:
Implement PHP classes for models to interact with the database and resource models to manage data retrieval.
5. Implement Controllers:
Create controllers to handle HTTP requests and manage data flow between models and views.
6. Develop Business Logic:
Write PHP classes to implement the business logic required for your custom features.
Frontend Development:
Create Layout XML Files: Define the layout structure for your custom pages and blocks in XML files.
Design Templates: Create PHTML templates to display the content of your custom features.
Implement JavaScript and CSS: Add any necessary JavaScript and CSS for the frontend functionality and styling.
Integrate with Magento Theme:
Extend or Create Theme: If needed, create a new theme or extend an existing one to accommodate the changes.
Update Layout and Templates: Make changes to the theme's layout and templates to include your custom features.
Testing:
Unit Testing: Tests for your custom modules to ensure that individual components work as expected.
Integration Testing: Perform integration testing to ensure your custom features integrate seamlessly with the existing Magento functionality.
Before deploying any changes to a live environment, ensure you have a database and files backup. Remember to follow best practices to Magento coding standards and consider scalability and performance in your development process.
#add custom features#add features in magento store#Hire magento developer#integration with magento theme#Magento Development
1 note
·
View note
Text
Building FullStack E-Commerce App using SpringBoot & React: A Complete Guide

The rise of digital commerce has made e-commerce development a high-demand skill. Whether you're a backend engineer, frontend developer, or aspiring full-stack professional, learning how to build a full-stack e-commerce app using SpringBoot and React can transform your career opportunities.
This comprehensive guide walks you through the key concepts, architecture, and implementation details required to build a modern, scalable, and responsive e-commerce application. Let’s explore how you can leverage SpringBoot for your backend and React for your frontend to deliver a complete shopping experience.
🔍 Why Choose SpringBoot and React for E-Commerce Development?
SpringBoot and ReactJS are two of the most widely used frameworks in modern web development.
SpringBoot simplifies Java backend development by offering a robust and production-ready environment with minimal configuration.
React empowers developers to build dynamic, high-performance frontends with a component-based architecture.
When combined, these technologies enable you to build a responsive, scalable, and secure full-stack e-commerce platform.
🧠 Key Features of a FullStack E-Commerce Application
Before jumping into the implementation, let’s break down the core features that a well-structured e-commerce app should support:
✅ User Authentication and Authorization (JWT, OAuth)
✅ Product Management (CRUD operations)
✅ Shopping Cart and Wishlist functionality
✅ Order Management
✅ Payment Gateway Integration
✅ Admin Dashboard for Inventory and Orders
✅ Responsive Design for Mobile and Desktop
✅ API-First Development (RESTful APIs)
⚙️ Setting Up the Development Environment
🖥 Backend (SpringBoot)
Technologies Needed:
Java 17+
SpringBoot 3+
Spring Data JPA
Spring Security
Hibernate
MySQL/PostgreSQL
Maven/Gradle
Setup:
Initialize SpringBoot Project via Spring Initializr
Add dependencies: Web, JPA, Security, DevTools
Configure application.yml/application.properties
Set up entity models for User, Product, Order, etc.
💻 Frontend (React)
Technologies Needed:
Node.js & npm
React.js (CRA or Vite)
Redux Toolkit
Axios
React Router
Tailwind CSS or Material UI
Setup:
bash
CopyEdit
npx create-react-app ecommerce-frontend
cd ecommerce-frontend
npm install axios react-router-dom redux-toolkit @reduxjs/toolkit react-redux
📦 Designing the Backend with SpringBoot
📁 Entity Structure
java
CopyEdit
@Entity
public class Product {
@Id @GeneratedValue
private Long id;
private String name;
private String description;
private BigDecimal price;
private String imageUrl;
private int stockQuantity;
}
You’ll also define entities for User, Order, CartItem, etc., along with their repositories and service layers.
🔐 Authentication with JWT
Use Spring Security and JWT (JSON Web Tokens) for secure login and protected routes.
🌐 RESTful APIs
Create REST endpoints using @RestController to handle:
/api/products
/api/users
/api/orders
/api/auth/login
Use @CrossOrigin to allow frontend access during development.
🌐 Creating the Frontend with React
🧩 Folder Structure
css
CopyEdit
src/
├── components/
├── pages/
├── redux/
├── services/
├── App.js
🛍 Product Display Page
Use Axios to fetch product data from SpringBoot APIs.
jsx
CopyEdit
useEffect(() => {
axios.get('/api/products').then(res => setProducts(res.data));
}, []);
Render the products in a responsive grid using Tailwind or MUI.
🛒 Shopping Cart with Redux
Manage cart state globally using Redux Toolkit:
javascript
CopyEdit
const cartSlice = createSlice({
name: 'cart',
initialState: [],
reducers: {
addToCart: (state, action) => { ... },
removeFromCart: (state, action) => { ... },
}
});
🔑 User Login
Implement a login form that sends credentials to /api/auth/login and stores JWT in localStorage for authenticated routes.
💳 Integrating Payment Gateway
Integrate a payment solution like Stripe or Razorpay on the frontend.
Use React SDK to collect payment details
Send transaction info to backend to create orders
Store order confirmation in the database
Stripe setup example:
jsx
CopyEdit
const handlePayment = async () => {
const response = await axios.post('/api/payment', { cart });
window.location.href = response.data.checkoutUrl;
};
🧾 Building the Admin Panel
Use role-based authentication to restrict access.
Admin Features:
View/Add/Edit/Delete products
Manage orders
Track customer data
Create a separate React route /admin with a dashboard UI using Material UI’s components or Bootstrap.
🛠 Best Practices for FullStack E-Commerce Development
Use DTOs to reduce payload size and protect internal structure.
Enable CORS in SpringBoot to allow frontend access.
Implement Lazy Loading in React for route-based code splitting.
Use React Query or SWR for advanced data fetching if needed.
Apply form validation using Formik + Yup or React Hook Form.
Cache static content (e.g., product images) using a CDN.
Use HTTPS and secure cookies for production environments.
🚀 Deployment Strategy
🧳 Backend:
Use Docker for containerization.
Host on AWS EC2, Heroku, or DigitalOcean.
Use NGINX as reverse proxy.
🧳 Frontend:
Build static files using npm run build.
Host on Netlify, Vercel, or GitHub Pages.
Use environment variables for API URLs.
📊 SEO Optimization for E-Commerce Site
Even for a full-stack developer, basic SEO is crucial. Here’s what to apply:
Use React Helmet to add meta titles and descriptions.
Apply structured data (JSON-LD) for product listings.
Ensure mobile responsiveness and fast load times.
Optimize images and lazy-load them.
Create a sitemap.xml for crawlers.
🎯 Who Should Take a FullStack E-Commerce Approach?
This tech stack is perfect for:
Java developers transitioning to full-stack roles
Frontend devs learning backend architecture
Students building real-world portfolio projects
Freelancers creating scalable client apps
Teams building startup MVPs
🎓 Learn This Stack with a Real Course
Looking for structured learning instead of cobbling it together? Explore a complete Udemy course on building a FullStack E-Commerce App using SpringBoot & React, available on Korshub with a 100% free coupon (limited seats only!).
✅ Conclusion
Building a full-stack e-commerce app with SpringBoot and React is not just about coding—it’s about creating a scalable, secure, and user-centric application. From designing RESTful APIs to integrating Stripe and managing complex state with Redux, you gain a robust skill set that employers and clients seek.
Start building today and take the first step toward becoming a complete full-stack developer.
0 notes
Text
Threads Clone with React JS: Comprehensive Guide

Introduction
Welcome to this comprehensive guide on creating a Threads Clone using React JS. This project offers an opportunity to delve into modern web development while honing skills in crafting interactive user interfaces. With React's component-based architecture, we'll construct a responsive platform for threaded discussions, idea sharing, and real-time connections. Join us in exploring React's capabilities and emerge with a fully functional Threads Clone.
Setting Up Your Development Environment
To commence our journey, it's imperative to establish the appropriate tools. Begin by installing Node.js and npm, facilitating easy management of project dependencies and JavaScript runtime. Visit the official Node.js website, download the installer, and follow the provided instructions. Once installed, npm becomes available, simplifying the management of project dependencies.
With our development environment in place, we proceed to create a new React app using the Create React App command-line tool. Open your terminal and execute a simple command like npx create-react-app threads-clone to initiate a new React project named "threads-clone" with all requisite files and configurations.
Understanding the project's structure is akin to having a map for our journey. Within the "threads-clone" folder, several key directories include "public" for static assets, "src" housing React components and application logic, and "node_modules" where npm installs project dependencies. Additionally, files like package.json and package-lock.json list project details and dependencies, facilitating efficient management.
With our development environment established and project initiated, we are poised to bring our Threads Clone to fruition.
Designing the User Interface
Prior to delving into code, let's delineate the user interface. Define main sections such as header, thread display, and comment area, identifying necessary components like ThreadList, CommentForm, and UserProfile. This preparatory stage provides a clear roadmap for development.
React's component-based structure empowers us to create reusable building blocks for the UI. Components like Thread, Comment, and UserProfile encapsulate specific functionalities, enhancing modularity and maintainability. Styling can be achieved through traditional CSS or styling libraries like styled components, promoting modularization and manageable styling.
Subsequently, we'll transition to the coding phase, transforming UI plans into a fully functional Threads Clone using React JS.
Implementing User Authentication
To fortify our Threads Clone with security and personalization, we'll implement user authentication leveraging services like Firebase. Initiate a Firebase project and configure authentication settings, enabling user sign-up, login, and authentication token management.
Develop user-friendly authentication components such as registration and login forms, neatly structured within React's component architecture for modularity and maintenance ease. Secure routes to restrict access to authenticated users using tools like React Router and manage authentication state globally through React Context or state management libraries.
Building the Thread Creation Feature
With secure user authentication in place, empower users to create engaging threads. Design a ThreadCreationForm facilitating input of title, description, and relevant information, implementing form validation for data integrity. Utilize React hooks like useState and useEffect for state management and side effect handling, respectively.
Persistently store thread data by connecting our app to a backend server, designing API endpoints for thread creation and retrieval. Utilize asynchronous requests like Axios or Fetch API for seamless communication between front end and back end.
Displaying Threads and Comments
Connect the frontend to the backend to retrieve threads and comments, utilizing API calls to fetch data stored on the server. Utilize React's useEffect hook to manage asynchronous operations and dynamically display threads, fostering a seamless user experience.
Implement a dynamic comment system, designing a Comment component to represent individual comments and integrating them seamlessly with thread display. Enhance user experience with smooth navigation facilitated by React Router, defining routes for different sections of the app.
Real-Time Updates with WebSocket
Elevate our Threads Clone with real-time updates using WebSocket, enabling bidirectional communication between server and client for instant data updates. Implement a notification system to keep users informed about new content, enhancing user engagement and fostering a sense of community.
Adding Likes and Dislikes
Infuse interactivity into our Threads Clone by adding like and dislike functionality, designing intuitive buttons for user expression. Update the backend to support user preferences for threads and comments, displaying like counts to visualize user engagement.
Responsive Design
Ensure accessibility across different devices with responsive design principles, adapting layout and elements based on screen size using CSS media queries. Conduct thorough testing on various devices to identify and address layout or functionality issues, ensuring a consistent user experience.
Testing and Debugging
Ensure robustness through unit tests using Jest and React Testing Library, simulating user interactions to catch potential issues early. Master debugging tools and techniques to efficiently resolve bugs and enhance application stability.
Deployment
Prepare for deployment by configuring settings and choosing a hosting platform like Netlify or Vercel, simplifying the deployment process. Share the deployed link with users globally, marking the culmination of our journey. Why choose a ready-made thread clone by Oyelabs for launching in the USA?
Selecting Oyelabs' ready-made Threads Clone for launching in the USA provides a strategic advantage for your entry into the online discussion platform space. The following compelling reasons underscore the benefits of this choice:
Proven Expertise: Oyelabs demonstrates a robust track record in developing discussion platforms, supported by experience in similar projects. This expertise ensures the delivery of a meticulously crafted and feature-rich Threads Clone.
Time Efficiency: The utilization of ready-made solutions by Oyelabs significantly reduces development time. Instead of embarking on building a platform from the ground up, leveraging Oyelabs' pre-built solution enables a faster launch of your Threads Clone.
Cost-Effectiveness: Opting for a ready-made solution proves to be more cost-effective compared to custom development. This choice eliminates the expenses associated with extensive development hours and iterative processes.
Scalability: Oyelabs' solution is thoughtfully designed with scalability in mind. This ensures that the platform can seamlessly accommodate the growth of your user base, handling increased traffic and user interactions without compromising performance.
Feature-Rich: Oyelabs' ready-made Threads Clone comes equipped with a comprehensive set of features essential for a discussion platform. This includes robust functionalities such as user authentication, real-time updates, like/dislike capabilities, and more, providing a fully-rounded solution out of the box.
Technical Support: Oyelabs stands ready to offer technical support for their product, ensuring prompt assistance in the event of any issues or the need for guidance during the implementation and deployment process.
Customization Options: Despite being a ready-made solution, Oyelabs may provide customization options to tailor the Threads Clone according to your specific requirements. This flexibility allows for the addition of a personal touch or the integration of unique features aligned with your vision.
Market Readiness: Opting for a ready-made Threads Clone allows for a swift entry into the market, capitalizing on the growing demand for online discussion platforms. This agility is particularly crucial in a competitive landscape.
Regulatory Compliance: Oyelabs, as a reputable development company, is likely to build its solutions with a commitment to adherence to industry standards and regulations. This aspect is particularly vital when launching a platform in the USA, where stringent data protection and user privacy measures are paramount.
Conclusion
In conclusion, our endeavor to build a Threads Clone with React JS has equipped us with valuable skills in modern web development. By prioritizing security, interactivity, and responsiveness, our platform offers a seamless user experience. Whether embarking on discussions or simply browsing, users can engage effortlessly, fostering a vibrant and inclusive community. As we reflect on our journey, let's continue to innovate and tailor our platform to meet evolving needs.
1 note
·
View note
Link
The written version of the video: frontend project structure
In this video, I'll explain to you how to create a front end project structure that scales and is easy to maintain.
Since modern frontend frameworks and libraries came into play, the client-side became responsible for a big part of logic and functionality. Now, we even start building serverless projects, where almost everything needs to be processed by the frontend.
This approach requires us to carefully plan the architecture of the frontend application and organize the project in the best possible way to make it scalable and easily maintainable.
When we start a new application, that may grow in time, it’s not enough to set up a clean installation of the app using CLI and just start coding. When the project grows, it can become really difficult to add new features or maintain the older code. That’s why it’s necessary to think about the proper organization of the folders structure, make it easy to use, and save time on the onboarding process for new programmers.
Before organizing the app’s folders structure, it’s important to understand the flow of the application, we will be building and have the technology selected.
In this article, I’d like to focus on an application built with React.js because this frontend stack it’s a choice of many companies, and it brings a lot of difficulty for developers.
React.js doesn’t provide a lot of insight about structuring the code base, as for example Angular. Besides that, installing additional libraries and plugins necessary for the React.js application like Redux or React-Router requires the initial structure to be changed for the better maintainability and scalability. And as always, it’s better to do it at the beginning of the development, then try to change it when the deadline is close.
Let's start!
#front end file structure#front end project structure#front end structure#frontend folder structure#react folder structure#create a front end project structure#how to create a front end project stucture#frontend project structure#how to structure frontend project#frontend architecture react#micro frontend architecture
0 notes
Text
Steam Deck - Quick Impressions
This is a beast you can approach from several distinct angles.
As a PC, it's surprisingly capable, even if its obvious gaming-focused form factor sort of makes the concept of running productivity software on it a bit odd. I couldn't imagine setting up an email client on this for any reason whatsoever, for instance, not when I can check on tickets from my phone. As a Terminal purveyor, however, it works quite well. I trolled a few non-geek colleagues by saying I'd purchased an Ono-Sendai Cyberdeck. My boss got it and ran with it for the first week.
As a gaming platform, it exemplifies the flexibility and caveats of Linux as a backend. When games work, they work flawlessly. When they don't, they often try and get there, limping pathetically the whole way, and require a host of control-related and SOC-specific tweaks to reach a comfortable state. This is when some games clearly weren't designed with a handheld's screen in mind, wherein any attempts to shift the resolution or the aspect ratio only makes what's happening onscreen even more difficult to parse. Lookin' at'cha, Cult of the Lamb...
I'm glad Valve went with Arch for their core, but as stated in a few Reblogs with @daemonhxckergrrl, they've left their fork of the OS unsecured by default, likely out of the assumption that it wouldn't be extensively tweaked on. As you could expect, I blew out the Read-Only partition, managed to find a HoloISO fork that maintains FSD support in an experimental form, and consequently replaced my Deck's hamstrung distro with a full-fledged Linux OS that has the same exact look and feel, but with no structural weaknesses. Bye-bye, Exposed Root User, hello added security!
As an emulation backend, however, it's a fucking godsend. Emudeck packs all the usual suspects in one Konsole-specific command, all you're left to provide for yourself consists of the usual BIOSes, backends and ROM dumps. A little digging got me to run Super Mario Odyssey and The Legend of Zelda: Breath of the Wild through Yuzu, the end result being higher framerates and crisper textures than those produced by the Switch itself. It really shows you the kind of "power-versus-output" bargain Nintendo ran, and how much their own console's popularity rests on the quality of the offered experience. From a hardware-related perspective, they're several years behind the curve. Pack their quality releases with a juggernaut of a handheld PC, and you're left with experiences that feel more than just straight-cut reproductions of the originals involved, but more like rejuvenations. As you'd expect, anything that meets the Switch's software requirements and exceeds them runs circles around anything that was released prior to it.
Eighties and nineties' console releases are a cinch to handle - plop your ROMs in the right folder and off you pop - while those approaching the Dreamcast's library come with the usual security-related dependencies. Emudeck's included Steam ROM Manager scrapes the Web for all of the artwork needed for a smooth integration with Valve's own frontend and even assembles custom Collections in your Library tab. Want to play Dante's Inferno? Just head to the RPCS3 Collection, open it and start the game from Steam. The rest follows suit. Similarly, adding a "Non-Steam Game" allows you to hook Firefox or any other program into Steam, making it easy to pull up a game guide or a mod config file.
The one caveat is that any ROMs added also show up on your main platforms as "remote" titles. Right now, my formerly-tidy PC library has a big stonkin' Uncategorized tag containing over 700 titles - most of them SNES ROMs.
Whatever you do, just don't go online with your later-years ROM dumps. You'll be lucky to get a few rounds in Splatoon 3 before Nintendo's moderation servers kick in and boot you out.
It's a pricey toy, but it's highly recommended. Don't forget to spring for an SD card, too.
5 notes
·
View notes
Text
Backend Web Development Using Node.js

Node.js has revolutionized web development by enabling developers to write server-side code using JavaScript. If you're already comfortable with JavaScript on the frontend, transitioning to backend development with Node.js is a logical next step. In this post, we'll introduce the fundamentals of backend development using Node.js and how to build scalable, efficient web applications.
What is Node.js?
Node.js is a JavaScript runtime built on Chrome’s V8 engine. It allows developers to use JavaScript to write backend code, run scripts outside the browser, and build powerful network applications. Node.js is known for its non-blocking, event-driven architecture, making it highly efficient for I/O-heavy applications.
Why Use Node.js for Backend Development?
JavaScript Everywhere: Use a single language for both frontend and backend.
Asynchronous and Non-blocking: Great for handling many connections at once.
Vast Ecosystem: Thousands of modules available via npm (Node Package Manager).
Scalability: Ideal for microservices and real-time applications like chats or games.
Setting Up a Node.js Project
Install Node.js from nodejs.org
Create a new project folder:
Initialize the project:
Create your main file:
Basic Server Example
const http = require('http'); const server = http.createServer((req, res) => { res.writeHead(200, {'Content-Type': 'text/plain'}); res.end('Hello, Node.js Backend!'); }); server.listen(3000, () => { console.log('Server running on http://localhost:3000'); });
Using Express.js for Easier Development
Express.js is a popular web framework for Node.js that simplifies routing and middleware management.npm install express const express = require('express'); const app = express(); app.get('/', (req, res) => { res.send('Welcome to the Node.js backend!'); }); app.listen(3000, () => { console.log('Express server running on http://localhost:3000'); });
Common Backend Tasks with Node.js
Handle routing and API endpoints
Connect to databases (MongoDB, PostgreSQL, etc.)
Manage user authentication and sessions
Process form data and JSON
Serve static files
Popular Libraries and Tools
Express.js: Web framework
Mongoose: MongoDB object modeling
dotenv: Environment variable management
JWT: JSON Web Tokens for authentication
Nodemon: Auto-restart server on code changes
Best Practices
Use environment variables for sensitive data
Structure your project using MVC or service-based architecture
Use middleware for error handling and logging
Validate and sanitize user input
Secure your APIs with authentication and rate-limiting
Conclusion
Node.js is a powerful and flexible choice for backend development. Its ability to use JavaScript on the server-side, combined with a rich ecosystem of libraries, makes it ideal for building modern web applications. Start small, experiment with Express, and gradually add more features to build robust backend services.
0 notes
Text
Convert M4A, APE, MP3, OGG, WAV To Automobile Stereo Supported Format
Top 10 free Audio Converters: Recommend free audio converter to transform music files into other audio codecs. FLAC Frontend is a convenient approach for Home windows users not used to working with command lines to make use of the official FLAC instruments. It accepts WAVE, W64, AIFF and UNCOOKED files for encoding and outputs FLAC or OGG-FLAC recordsdata. It is ready to decode FLAC information, check them, fingerprint them and re-encode them. It has drag-and-drop support too. It's examined on Home windows XP SP3 and Home windows 7, but should work with Home windows XP SP2 or newer. It requiresNET 2.zero or later. CUE file is the index file related to APE file, if there is no such thing as a CUE file, it will probably't choose the music when playing APE file. Open the CUE file with Notepad program, you will find that it information the singers of total album in APE information, album identify, APE file title, monitor quantity, each track title, artist, start time and end time. Thus, it's so essential for you if you want to burn CD with the APE file. To split single APE file into particular person songs, we should want the CUE file for help. Medieval CUE Splitter is the versatile APE CUE Splitter software program for you to split an extended APE file into particular person songs. Let's have a look at find out how to use Medieval CUE Splitter to separate your APE information into individual songs with detailed steps. In terms of conversion from APE file to MP3, I bet you've got scanned a lot on the Web to seek out one of the simplest ways out. However solely few of them indeed help the conversion. Even, most APE converters enable to do this, however you in all probability must download two or three plug-ins to make it work. It is actually boring, is not it? Other than that, some converter instruments take a lot time on putting in to your pc and importing the APE file. What's worse, the uploaded audio file may be invalid as a result of format restriction, audio-transcoder.com which implies it solely helps the input formats like MP3, WMA and WAV. Luckily, it will not be an issue stopping you from APE to MP3 conversion with apowersoft audio converter, a complete free and dependable online software. APE: APE is a really extremely compressed lossless file, which means you'll get probably the most area financial savings. Its audio high quality is similar as FLAC, ALAC, and different lossless information, but it isn't suitable with nearly as many gamers. In addition they work your processor tougher to decode, since they're so extremely compressed. Generally, I would not suggest utilizing this unless you are very starved for house and have a player that helps it. Change the audio profile parameters for output customization; edit ID3 tag information of your audio tracks. The usual path to including recordsdata to your iPhone, iPad, or iPod runs by means of iTunes, and it will not accept FLAC information. The solution? Convert them to Apple's ALAC format. No matter whether or not you could have a LAPTOP or a Mac, elsaostermann17.hatenablog.com though, you may need to get the correct utility to bring your FLAC recordsdata into the iTunes fold. - Convert video and audio to various in style format, including MP4, AVI, FLV, WMV, https://shantellmock28.hatenadiary.com/ MOV, WAV, WMA, MP3, etc. A cue sheet, or cue file, is a metadata file which describes how the tracks of a CD or DVD are laid out. Cue sheets are stored as plain text files and commonly have a ".cue" filename extension. The free trial model of AudioConverter Studio can convert up to 10 files directly. You may repeat the method as many time as you would like. Should you like this system, you may register it and remove all limitations. WAV file extension is related to a digital audio format that is used for storing sound tracks with lossless high quality. It permits saving audio knowledge with completely different bitrates and frequencies. The usual configuration is forty four,1 kHz, sixteen bps, stereo. WAV files have a lot in frequent with AIFF recordsdata, however they are based on RIFF technology instead of AIFF. WAV files are mostly used on Home windows platform, being supported by Windows Media Gamers and different programs. Most frequently codec is MS ADPCM.
AAC Converteris a robust All-In-One batch converter for changing MP3, WMA, WAV, M4A, MP2, AMR, and many others. to Advanced Audio Coding-AAC. As well as, you can too use this system to extract audio from AVI, MP4, WMV, 3GP, MOV, MPG, FLV and the like video file. The Real Participant Cloud app lets you stream unsupported movies to your TELEVISION together with your pc or cell device.You possibly can rapidly and easily set up your music assortment, and full the tag information for each file with all the perfect instruments out there. Some of these tools include filtering the view of files to work on by file type or all at once, renaming files in response to their tag data (supporting folder structure), populating tag information from filenames, discovering album information in Web, easily creating Playlists, synchronizing ID3v1 and ID3v2 tags, utilizing the word substitute wizard to change many tags at once.There are full of assorted audio converters on the Web so that folks's choices are diversified. However now we have to recognize some of them are useful however some should not. First things first, we have to be cautious to select one that's principally appropriate to be used on the premium that the tool is 100% licensed and 100% clean. Let's check out learn how to make it.
1 note
·
View note
Text
Ape To Flac Converter
As Wes Phillips not too long ago reported on this website , CD sales are down and legal downloads of audio files are up. Stereophile has been criticized more than once for not paying enough attention to the themes of MP3 and other compressed file codecs, reminiscent of AAC , and for providing no steering in any respect to readers about the way to get the most effective sound high quality from compressed downloads. With excessive compression ratio, Monkey's Audio achieves higher than average lossless compression. When utilizing APE to compress your distinctive audio source, the encoded audio recordsdata are usually decreased to roughly half of their distinctive uncompressed file measurement, while different lossless formats like FLAC varies typically between 30-50%. Like APE, FLAC can also be a lossless audio format and the most properly-preferred one, so changing APE to FLAC can widen the APE utilization while sustaining the lossless genuine audio prime quality. To ensure you to get a straightforward altering ape to flac converter mac online to FLAC experience you had better select the professional APE to FLAC converter, like Avdshare Audio Converter. To do this job, you need a professional APE to FLAC Converter - Faasoft APE to FLAC Converter which is a robust APE to FLAC Converter and may easily convert APE to FLAC with almost the identical compression fee and output quality. Batch Tag Enhancing Write ID3v1.1, ID3v2.three, ID3v2.4, MP4, WMA, APEv2 Tags and Vorbis Feedback to a number of files at once. Batch Convert think about having a mp3 converter which may convert FLAC to mp3 with one click on selecting the entire music tree? Batch Converter can, and with advanced file naming rules the transformed mp3 recordsdata are named just as you want.
Complete Audio Converter is an easy-to-use software conversion software with support for a bunch of codecs and skill to tear audio CDs. VLC player - this free multimedia player is a well-liked possibility for individuals who wish to open FLAC information on Windows. With this application, you may open this format with out putting in further codecs. It might also play videos, DVDs, MPEG, MP3s, SVCD and other recognized audio as well as video codecs. The feature commonly known as Mp3Gain (the correct term is normalization), is good if you want to have an optimal level of volume in all of the mp3 files from your collection volume equalizer musics editor change by self volume software program normalize music mp3 sound correction. Sound Normalizer is designed to optimize the capacity of your moveable music participant by lowering the size of MP3 recordsdata. MediaHuman Audio Converter is a freeware software for Mac OS X and Windows. It could possibly make it easier to to transform your music absolutely free to WMA, MP3, AAC, WAV, FLAC, OGG, AIFF, Apple Lossless format and bunch of others. 1.- Open the CUE file in K3B. 2.- Choose convert tracks to FLAC. 3.- Press Start. identify this script as split_ape, chmod +x it and put in some listing in your path. I made an analogous script for flac file as source, simply change each ape with flac in this script. When a listing is dropped on the application, it processes all files in the whole directory tree. The directory structure is replicated in the location where mp3 files are saved. Click on the "Open folder" button to entry the transformed FLAC information by way of Windows Explorer. I can not affirm this solution a hundred% as a result of I deleted the unique MP3 profile during my mad experimentation, however I am able to convert MP4 to Mp3 at whatever bitrate I chose. Subsequent edits to the profile do not seem to cause problems. The app can convert a number of files concurrently in a batch, saving them in a ZIP archive to speed up downloading. Transform videos to MP3, M4A or different media format. This system supports over 500 in style and uncommon video formats: MP4, AVI, FLV, MKV, DVD, WMV, HD, H.264, MOV, VOB, SWF, TS, ape to flac converter mac online WebM, Xvid, and many others. Save soundtracks and extract music from a video in seconds. Unique audio quality is preserved. Convert APE to lossless audio format like convert APE to WAV, convert APE to FLAC, convert APE to Apple Lossless ALAC M4A. Convert APE to lossy audio format like convert APE to MP3, MP2, WMA, AAC, AC3, AIFF, AU, RA, DTS, OGG and and so on. Since wav information do not comprise any tags, all wav to flac conversions would require some sort of after conversion tagging of the flac information. mp3tag could be very straightforward to make use of and, with just a bit effort and experience, may even be very powerful.MPEG-4 SLS is a special codec, having a AAC core monitor and a 'correction observe'. Also called HD-AAC, SLS stands for Scalable to Lossless. Nonetheless, there is to date still no affordable software to play, encode or decode (the lossless part of) SLS information. FLAC compresses audio file with out losing quality, which preserves prime quality in relatively smaller storage than other lossless audio codecs like WAV, APE, and so on. Not solely can Hamster convert a number of audio files in bulk, but it could possibly merge the recordsdata into one, much like Freemake Audio Converter.Note: You need to know that when you find yourself uploading an APE file to this system, the Recordsdata of Kind should be All Files", or else it can't work. Thank you! Another newb to Foobar - I had been using MusicMatch Jukebox since model 5, bought a lifetime license somewhere around model 7, and had been steadfastly refusing to change when Yahoo purchased it after which dropped support entirely. I finally had to replace the one computer that also ran XP and lost my means to run MMJB on the new machine. This tutorial has made the change-over nearly painless.FLAC is a lossless audio format that gives compression in dimension with out loss in high quality. This open source codec works much like ZIP archiving, however offers better compression particularly for sound knowledge (as much as 60%). FLAC audio is supported by nearly all of platforms like Windows, Unix, Amiga. That is the only non-proprietary lossless codec with nicely documented specs and API. Supports 4-32 bps resolution, 1-eight channels. In streaming protocol FLAC makes use of CRC checksums.Added converting Wav (PCM 8, sixteen, 24, 32 bits, DSP, GSM, IMA ADPCM, MS ADPCM, AC3, MP3, MP2, OGG, A-LAW, u-LAW) to FLAC recordsdata. Within the Open Media dialog, click on the Add button and browse for your music file. Then click on on Open. LL2MP3 is a frontend utility that converts flac, ape and wav audio information to mp3. Totally different from different lossless codecs like WAV, FLAC is error resistant. Faasoft CUE Splitter is designed for both Home windows users and Mac users to split CUE associated audio file like cut up MP3 CUE, cut up FLAC CUE, break up M4A CUE, cut up APE CUE, break up WAV CUE, Split OGG CUE, MPC, WV, TAK, TTA, AMR, AAC, AIFF, AU, RA, and so forth. With it, you'll by no means have hassle in easy methods to play lengthy audio information.
1 note
·
View note
Text
How To OpenCda Information From Arduous Drive?
Freemake Audio Converter converts music files between 50+ audio codecs. Our Superfast YouTube to MP3 Converter software can also be compatible with many other online video sites equivalent to Facebook, Vimeo, Dailymotion, VK, how to open cda music Files Instagram, Metacafe, Soundcloud, AOL, and Vevo for now. And on this half, you're really helpful with one of the best CDA Recorder With this wonderful CDA track recording device, you possibly can easily and effectively seize the CD audios and save them in MP3 format. There are a great deal of online providers for converting files, so for how to open cda music files those who'd prefer to not install any software program and you do not have 1000's of recordsdata to convert, you may upload WMA recordsdata and download MP3 variations. Nero Burning ROM and Nero Express provide specialized settings for the wanted file naming customization possibility. I had proven my spouse the best way to rip her own (classical) CDs on a Mac laptop computer using the iTunes defaults and left her to it: job accomplished. Wait few seconds without cost CDA to MP3 changing with Home windows Media Player robotically. Step 3. Choose a MP3 file from iTunes library or add the desired file out of your LAPTOP. Click on File > Convert > Create WAV Model. The free Wondershare Video Converter is another useful all-in-one media converter that does an excellent job of converting your media recordsdata to a variety of formats, while also including a ton of extras.

Insert an audio CD to the disc drive and click on Load from CD" and all of the available tracks are listed. I have a one of a kind track that I can't replace that was inmp3 format earlier than I upgraded to 8.1. However now it's incda and I can't for the lifetime of me determine how to open cda music files you can get it transformed again. Personally I avoid this and simply have all of the recordsdata in the root of my MP3 CDs, but naming the track files in a logical manner often includes prefixing the file names with 001, 002, and so forth, and that wastes screen area when the song title scrolls in the window. CDA is a shortcut created by your working system to mark tracks of an Audio CD. Audio CDs don't include actual recordsdata. Computer laborious drives store information in concentric rings known as tracks. Select Monitor if you wish to choose one or more complete audio tracks to extract. It is easy to transform recordsdata and may be utilized for batch convert MP3 to CDA. This player was developed by Nullsoft and it permits users to play multimedia content material reminiscent of audio and video. Convert audio recordsdata to video formats and uploading to sharing websites. It will probably be part of CDA information to 1 massive AAC, ALAC, FLAC, WAV, M4A, M4B, MP3, OGG or WMA. If you are using Home windows, you'll be able to open CDA files with Windows Media Participant which is often preinstalled in the working system. Xilisoft Audio Converter has an intuitive structure and imports and exports in all of the essential audio formats. They are something completely completely different than regular windows information recordsdata (EXE, TXT, MP3, etc). Once that is done, all of the songs should be selected, if not select all of them press the second button down on the right hand aspect to rip and encode the songs to MP3's on the fly.

Missing software and file associations are the most common cause ofCDA file problems. We evaluated the very best Mac CD burning software program available available on the market at present. I by no means found the best way to rip a CD in flac format, solely wav appears to be out there, and the tags were not stuffed. The CDA format is considerably deceptive, as it is not a file, nonetheless reasonably a shortcut that Microsoft uses to level to the songs encoded on an audio CD. In apply, Home home windows Media Participant uses the CDA shortcuts and creates recordsdata in your choice of format if you happen to copy songs to digital recordsdata, a course of referred to as ripping. You might also have seen that they have a measurement of 1 Kilobyte each and that clicking on them plays the selected monitor in a music player on the system (the default is to open them in Windows Media Player). Step Insert the CD the music is on and rip it. CD rippers convert the raw digital data on music CDs into files a computer can learn. It refers to a CD Audio shortcut file format used to trace the time and size of music on CD and does not comprise audio in actual which implies. XLD makes use of not decoder frontend but library to decode, so no intermediate information are generated. It's a file extension for a CD Audio shortcut file format, which does not include any audio information, however as a substitute inform the place on the disc each observe starts and stops. Functions are equally restricted since you possibly can solely convert CDA file to MP3 with no enhancing options. When performed go to your output folder you configured earlier to seek out your music, here is what the folder construction appears like in case you configured the filename format as recommended. When you're utilizing Home windows and wish to convert your CDs to FLAC, Precise Audio Copy is a wonderful choice and offers one of the best error correction money should purchase, at no cost! The other codecs, like OGG, FLAC, and many others., aren't as broadly supported by MP3 gamers as we'd prefer to see. Any Video Converter Ultimate is an easy-to-use and skilled video and audio converter. You may also burn AC3 audio recordsdata to DVD disc straight with Windows Media Player. The perfect WMA to MP3 converter, period. The integral decision to maintain your MP3 files assortment organized. 2. FREE RIP Converter- Free Rip Converter easily extracts music from an Audio CD to MP3 and other numerous format. AudioConverter Studio can even type your music whereas changing. CDA to MP3 Converter can obtain disk particulars from the online database - FreeDB. Keep in mind to name your track with the '.mp3' extension, else VLC will convert it to the fallacious format. Total Audio Converter takes care of the job. Thus in case you are searching for a more practical device that gives you more options to burn audio CD from MP3, then Streaming Audio Recorder is the only option. In order to begin working with the Converter is ample to acquire the browser if you don't have one, and start the conversion.

1 note
·
View note